After working over 10 years in different roles in the IT industry I felt like I needed a change. I needed to break the routine and jump out of my comfort zones into the unknown.
Prologue
I had started to lean towards devops and more often found myself avoiding other areas in projects. How cool would it be if I could just concentrate into this one area and develop my skills there to the fullest?
Well, my wish became reality when I joined PolarSquad on the 1st of October 2018. This was the biggest leap of faith I have done during my career so far but it has felt like the right one from day one. Docker is no longer a stranger to me and running builds using containers already feels natural to me. Coming from MS tech background where containers are not yet an everyday thing there’s always something new to learn.
How this blog was born
I had been thinking about starting my own blog for several years already but had not had the proper time nor motivation to get started with it. After jumping into a new company it felt like the right time.
Where am I going to host this website? I had been learning about Google Cloud Platform recently and was anxious to try out something real there so this was a no brainer to me. I could have used just GitHub Pages to be honest but what would be the fun with that!
What platform should I use for the blog? I had been reading about JAMStack a year ago and found one particular static website generator called Hexo which felt like a good choice so I went with that.
What service in GCP should I utilize for hosting a static website? After going through all the possible options the Google App Engine (GAE) seemed like the best option - PaaS service that supports custom domains and SSL certs, what’s not to like? It also downscales well so running cost is minimal.
It was time to start working on the infrastructure.
First you need a project
Anyone who has used GCP knows that everything begins with a project. So I started by figuring out how can I automate the creation of projects. I like to avoid manual steps whenever possible. It turned out to require couple of things.
Organization: if you want to automate the creation of projects in GCP you really need an organization in Cloud IAM. I had to create Cloud Identity for myself by validating it through the custom domain I registered for this website. It was free however.
Project for creating other projects: in order to create projects in automated fashion you need one “master project” aka DM Creation Project under your organization which is responsible to provisioning new projects. You can find more details here.
I ended up investing a lot more time into this than I had planned but I felt this might become handy in the future. Eventually every GCP customer has to deal with this when they start their journey with Google Cloud Platform. You have to be able to manage your projects properly when you start advancing further than POCs.
So after acquiring an organization in Cloud IAM and creating the DM Creation Project - yes, these parts are done manually - I created a Deployment Manager (DM) template and schema for defining the actual GCP project where the website would be deployed.
- DM template for creating new projects: project-creation-template.jinja
- Schema for the DM template: project-creation-template.jinja.schema
Since I was also using Cloud Build for executing the Deployment Manager deployment I needed to ensure it has sufficient permissions in the DM Creation Project. You can find the instructions here.

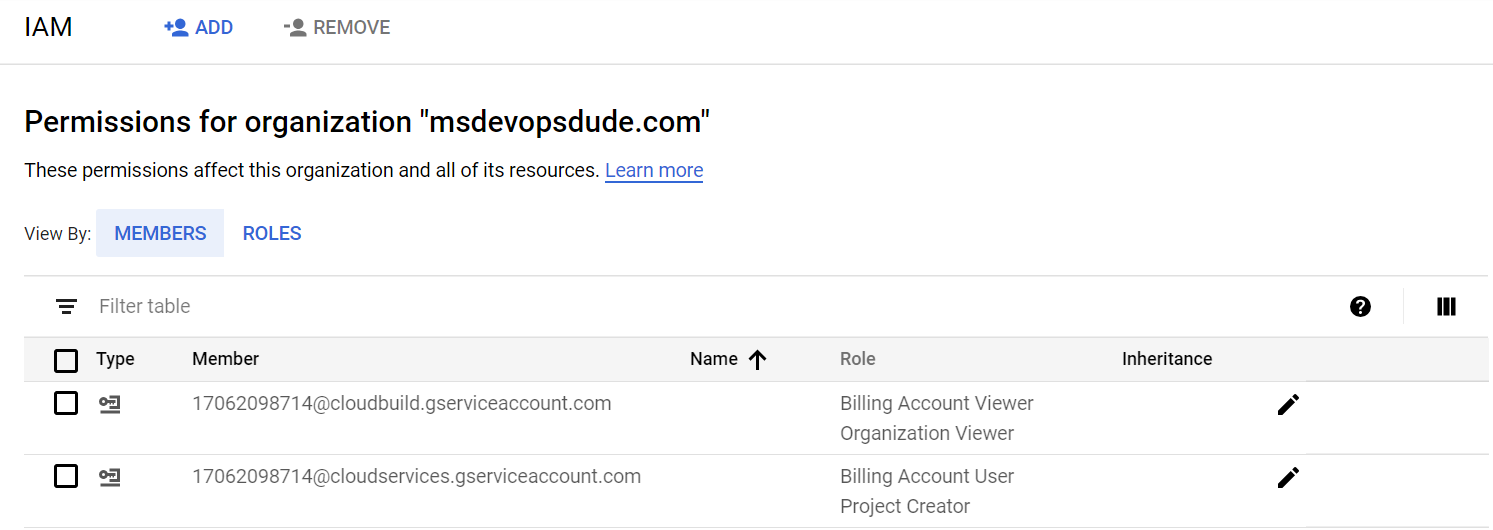
In addition you need to give following Cloud IAM roles for the CB Service Account on the organization level to run gcloud commands for dynamically populating environment variables
- Billing Account Viewer
- Organization Viewer
As a result you should get something like this

Here’s a recap of the CI/CD plan
- Provision the GCP Project for the blog from the DM Creation Project using CB Service Account
- Provision the initial infrastucture for the blog from the actual GCP Project using it’s own CB Service Account
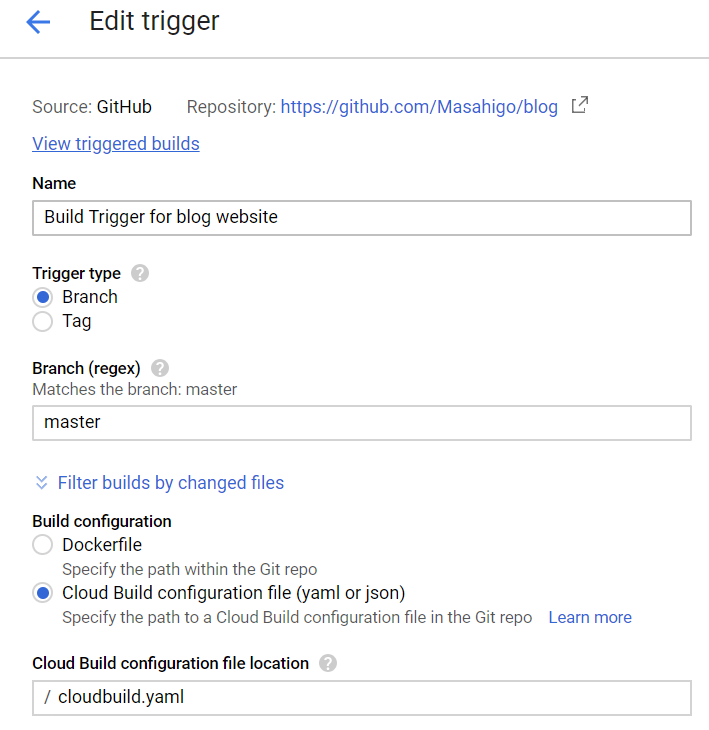
- Implement the deployment pipeline and once working create a Build Trigger for it
CI/CD pipelines using Cloud Build
Google Cloud Build is a service for executing builds on GCPs infrastructure. It was previously known as Google Container Builder and what it essentially does is that it spins up Docker containers on the fly and executes the commands that you specify in the given context. It’s 100% Docker native and works amazingly fast. It supports only Linux based containers though so if you need to build .net code you need your own build machine to handle that part for you. What makes it different from similar services like GitLab CI is that Google provides a Local Builder which makes it much more convenient to work on your build configs.
Infrastructure
Disclaimer: To achieve a fully automated infrastructure provisioning would have required Cloud Build Triggers for the blog-infra repository but as I was learning by doing I decided to leave this part out from CI/CD for now. I did however create Google Cloud Build config files and submitted builds manually using those.
The infrastructure for the blog is very simple: one App Engine service hosting the static website. On top of that I’m utilizing Cloud DNS for managing the DNS zone and records. For now I’m just using the root domain but my plan is to learn how to register subdomains dynamically and utilize those for eg. dev/qa environments.
Here are the commands used for the initial provisioning:
1 | #https://github.com/Masahigo/blog-infra |
As you probaly noticed the App Engine itself did not require anything else than initialization in the project.
Deploying the blog to App Engine
This was the easy part. I had already figured out the commands I needed to run in the build context:
1 | git clone --recurse-submodules https://github.com/Masahigo/blog.git |
Without going into too much details a short explanation of the main points
- There’s one Git submodule which points to a fork of Hexo’s NeXT theme
- The command
hexo generatecreates the static website content and renders it to subfolder/public - This rendered version of the blog is then copied under subfolder
CI/wwwbecause the App Engine expects all static files to be located underwwwsubfolder - The subfolder
CIalready contains the App Engine configuration for the static website:app.yaml - The command
gcloud app deploypackages the files inwwwfolder and deploys those to the default App Engine service
1 | runtime: python27 |
The build config for executing the same commands resulted in
1 | steps: |
Testing the deployment from CLI:
1 | gcloud builds submit --config=cloudbuild.yaml . --project=ms-devops-dude |
After this it was fairly straightforward to create a Build Trigger to do the same every time there’s new commit to master in the blog’s repository.

Some lessons learned
As you can imagine not everything went like in the movies when working on my first CI/CD pipelines on GCP. Here’s a couple of obstacles I encountered along the way.
Environment Variables
The out-of-the-box environment variables in Deployment Manager are quite limited. It also turned out that running gcloud commands in build step context and storing those into environment variables on the fly was not possibly. (Well, it would have required substitutions but those can only persist static values)
I ended up in following kind of solution; Declare the environment variables in a separate bash script where also gcloud command is called along with the variables passed in as template properties:
1 | export GCP_PROJ_ID=`gcloud info |tr -d '[]' | awk '/project:/ {print $2}'` |
Utilize the entrypoint in build config
Google Cloud Builders allow you to override the default entrypoint in Docker. I found this very useful when executing bash script using gcloud builder:
1 | steps: |
Git submodules
If you are referring to Git submodules in your main repo those are not checked out by default in Google Cloud Build. To get around this you can specify one additional build step in the beginning of the pipeline using the git builder:
1 | steps: |
Handle GAE appspot.com redirection for naked domain
Last thing I wanted to fix before going live with this website was to redirect the default App Engine url (ms-devops-dude.appspot.com) to my naked domain (msdevopsdude.com). There was a blog post about this but it didn’t really cover my scenario that well.
Here’s what you basically need to do
Create a separate GAE service in my case I call it redirect
1 | service: redirect |
Create main.py for the 301 logic
1 | import webapp2 |
Override the routing rules in dispatch.yaml
1 | dispatch: |
Closing words
My first impression on Google Cloud Build is quite positive. It gets the job done and it’s Docker support is superior. Google Cloud Build’s pricing is also attractive: you get 120 minutes of free build time per day and it allows you to run up to 10 concurrent builds per project. I will definitely continue my experimentations on it.
I hope you have enjoyed reading my first blog post. Until next time!

