
Taking full control of your zero-downtime deployments in Azure App Service on Linux.
Azure App Service
It was roughly 7 years ago when I started to learn about Azure. Around those times the default way of hosting web applications on Azure PaaS was to use Azure Cloud Services. It felt like a complex service to manage and comprehend back then. 3 years later I’m working on my first real Azure project and being responsible for the whole infra. Azure is no longer called the Microsoft Azure, the classic deployment model has been deprecated in favor of ARM deployments and there’s this new service called the “App Service” which feels way more intuitive and works very well for running .NET-based workloads. After several Azure projects to follow, in which the same service was used for running different kinds of .NET-based web applications, both frontend, and backend, this service never failed me down.
But what about running Linux-based workloads on it? Microsoft announced GA for App Service on Linux in late 2017. This was the first time I encountered the term “Web Apps for Containers”. We tried it out in a project back then to host a custom, Java-based application that was containerized. It worked ok but felt a bit immature those days. For instance, it lacked proper VNET integration capabilities. Fast forward to the present and it supports almost all of the features that its .NET counterpart does.
I wanted to see if it was possible to use the same, well-proven techniques learned from previous projects and achieve zero-downtime deployments by utilizing the built-in features this platform has to offer.
Some basics
Before jumping ahead it’s important to understand at least some basics and terms referenced throughout this blog post.
The Azure App Service consists of the following building blocks
App Service plan: Hosting environment for your web applications (web apps). Comes in two flavors (managed Operation Systems): Windows & Linux. There are two types of web apps it supports: App Services and Deployment slots. You can think of it as your web server that Microsoft manages for you. But it’s a lot more than that. It can be scaled up/down and also scaled in/out. This translates into changing its compute resources on the fly and the underlying load balancers handling the necessary routing under the hood. Microsoft has pre-provisioned pools of these managed VMs with different specs waiting to be requested by the service to consume and therefore operations like changing the pricing tier or the number of instances takes usually around 10-20 seconds.
App Service: Instance of your live web app. Depending on the App Service plan it was deployed to - it’s either an IIS application or a Linux process. On the Linux side, it can also be deployed as a container, the deployment method that I prefer. Trust me, you don’t want to end up troubleshooting compatibility issues with the default Linux distro of the hosting environment.
App Service has a lot of features, which I’m not going to go through here in more detail, but Application settings (app settings), Deployment slots and performing a swap are the important ones to grasp in regards to code deployments.
App settings: Your web app’s real-time configurations. If you modify these on a running web app, it gets restarted automatically. App Service takes care of injecting and making them available in the context of your running application.
Deployment slot: Another instance of your app. You can deploy several of these and have them running side by side with your live web app. For blue-green deployments, you need only one though and I like to call it a staging slot. It has all the features and functionalities of its parent (App Service) but it’s possible to have also slot specific app settings that affect only the app running in the deployment slot. Microsoft calls it a staging environment in their documentation.
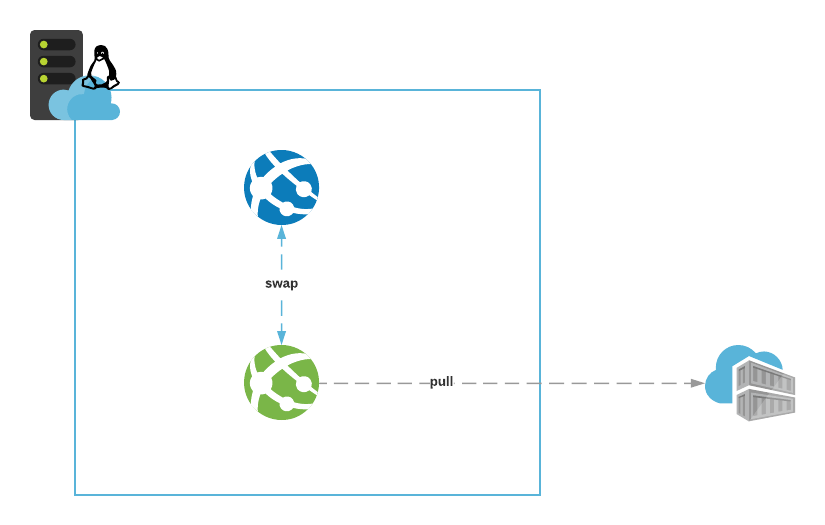
A swap: Performing a swap in App Service means replacing the live app (blue) with a running app from a deployment slot (green). When done correctly, and your app is stateless by design, the end-user experience is not affected. App Service takes care of draining the remaining user sessions before completing the switch. In normal circumstances, this shouldn’t take longer than 30 seconds in total. Deploying your new code (or container) into a staging slot (green) first ensures the live app is never disrupted directly and allows you for validating it and making the decision whether to roll it out or not. App Service’s managed load balancers are doing the heavy lifting here, you just define the source (staging slot) and target (live app) for the swap.
Again, there’s a lot more to this story which I’m not covering here to keep things simple.
Continuous deployments
While the platform (App Service) supports different deployment mechanisms to choose from I would personally just stick with the ones guaranteed to work. On Windows, it’s Web deploy and on Linux the container-based approach.
Immutable staging slot
My biggest takeaway from using a staging slot in Azure projects is that you should always create it from scratch before starting a new deployment.
They don’t tell you this in Microsoft documentation and I don’t recall anyone sharing about this either. I’ve found it the only way to keep the deployments consistent. It guarantees immutability and makes your deployments faster.
How you create it is totally up to you.
Here’s an example using Terraform where the staging slot is created as part of the main IaC. Using ARM it might make more sense to create it as a separate step. Docker-related app settings are ignored on purpose because the app’s deployment is done from Azure CLI and thus controlled past Terraform.
1 | resource "azurerm_resource_group" "example" { |
After the whole deployment is complete, the staging slot which contains the old/previous version of the app, can be removed. In production environments, you might want to leave it intact (in a stopped state) for a moment to be able to roll back easily in case of emergency.
1 | APP_NAME=$(terraform output -raw webapp_name) |
I’m executing these steps in specific order to make sure the infrastructure is updated before deploying the app’s new version.
Deploying a container image
Now we cover the steps that need to happen for deploying a new version of your app. We are using Azure Container Registry as the private Docker registry in this example with admin account enabled.
Code versioning is taken care of by Git. But deploying code is a bit different story than deploying a container image.
I highly recommend adopting a method popular in Kubernetes deployments which is to use git hash as the tag for container images.
Here are quick steps on how to get started using Bash & Azure CLI
1 | # Use the tool of your choice build your Docker container image |
These steps should be handled from CI.
Then the actual deployment of the container image into a staging slot using Azure CLI
1 | az webapp config container set \ |
If you followed closely until now you might have few questions
What credentials are being used in App Service for pulling the container image? When omitting them like this it pulls out the admin account’s credentials if they’re enabled in the ACR (this is not documented btw)
Why not just “deploy” the container image from IaC directly? I tried this approach as well and it didn’t work that well
Performing the swap
We have the new version of the app (green) waiting to be rolled out for end users. If you’re doing this in an automated fashion, which should be your end goal, you want to at least validate that it’s initializing properly and “warmed up” before initiating the swap.
Trying to do a swap using a malfunctioning instance of an app as source can have unpredictable consequences. At best the swap just gets “stuck”. Worst case scenario is that your end-users start getting bad gateway and this is when you wish you had configured a failover site in front of your App Service.
When App Service has initialized the container it tries to validate if it’s healthy. It does this by making a GET request to the root URL of your containerized app and expects an HTTP response in return. You need to take this into account or your app will never see daylight.
Here’s an example of how to poll and determine whether the app is ready to serve requests using Bash & curl
1 | STAGING_SLOT_HOSTNAME=$(terraform output -raw staging_slot_hostname) |
Initiating the swap after this can be done using a simple Azure CLI command
1 | echo "Swap staging slot to production" |
I have been using this kind of approach from a CD pipeline successfully. If the app in the staging slot never responds with HTTP 200 the pipeline’s default timeout will eventually kick in and the pipeline run fails. No harm was done, just wipe out the staging slot before the next deployment.
Conclusions
Orchestrating blue-green deployments in Azure App Service is not hard. There are a few nitty-gritty details one needs to be aware of but overall the platform nicely abstracts the complexity, and still giving granular control over deployments.
App Service on Linux has matured into a real alternative to Azure Kubernetes Service (AKS) for hosting container-based micro-services with hybrid connectivity needs.