A kickstart to the development of Terraform based Landing Zones following Azure’s Cloud Adoption Framework.
A short introduction
Within the past year or so Microsoft has put a lot of effort into documenting best practices and guidelines for customers embarking on their journey with Azure. This is called the Microsoft Cloud Adoption Framework for Azure (CAF). Simultaneously, they’ve started to roll out some tools and concepts to make it easier to jump in.
Landing Zones, on the other hand, is a concept that was introduced by AWS a few years ago. It’s an abstract idea although AWS tried to implement and sell it as a ready-made solution, with poor success. I’m not the best person to describe them, but you can check this excellent post blog on the topic. Essentially they’re just a way to layer the building blocks of your cloud infrastructure. The technology used for implementing the IaC for Landing Zones is entirely up to you.
I started to investigate the Azure Cloud Adoption Framework landing zones for Terraform for a customer case this spring. They were planning to use Azure DevOps as the CI/CD tool. I had to figure out a lot of things before I could concentrate on developing the actual Landing Zones so I figured to share my view on this.
Getting started
I bet you a million bucks these are the first things you encounter
- A tool called Rover
- The concept of a Launchpad
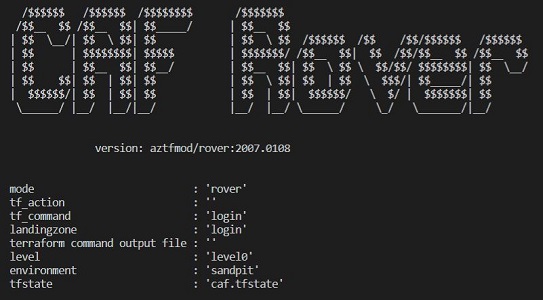
So what are these? With Terraform, when you start to build the IaC you most likely need a remote state. Then it would be also nice to have a place to store some secrets. There’s your Launchpad. And Rover is a simple tool for deploying Terraform based landing zones, including the launchpad (level0). Both are provided by some MS folks for our convenience.
Since we’re dealing with mainly IaC here it’s not mandatory to use Rover of course. This is pure Terraform stuff. But this so-called bootstrapping of Terraform’s remote state and managing few credentials is something you’d need to handle in any case, one way or another.
Local development
I recommend starting to use Rover from the get-go. Microsoft has done a great job of wrapping the tool into a Dev Container. All you have to install in your local machine is Docker and VSCode with a couple of extensions. Using the Dev Container you have all the tools needed to start developing Terraform based Landing Zones.
Check the getting started guide for detailed instructions.
When you start Rover in VSCode you’ll notice the Dev Container being initialized

Once the Dev Container has loaded you can check few things from the terminal
1 | [vscode@c34ec5f22ad1 caf] $ pwd |
A quick start directly from Rover
I’ve created a simple landing zone example that we use as a reference here. It contains a simple Azure policy for requiring a specific tag for resource groups.
Prerequisites
- Azure subscription
- A User account with Global Administrator permissions
- Azure DevOps organization
What we’re going to do
- Azure Repos to store our Terraform configs and pipeline definition
- The referenced Git repository
- Interact with Azure DevOps (ADO) using the Azure DevOps extension for Azure CLI
- It supports only Personal Access Tokens (PAT) as an authentication mechanism
- Creating the PAT is the only manual step - the rest is handled from the command line
- Rover is used to deploying the reference landing zone
- Test and verify the landing zone is working
Create a PAT from Azure DevOps and grab the token
Agent Pools:
Read
Build:Read & Execute
Code:Read write, & manage
Project and Team:Read, write, & manage
Release:Read, write, execute & manageNote: PAT has permissions to manage ADO Projects in this example!

- Login to Azure CLI via device login
1 | $ az login |
- Install ADO extension and login
1 | $ az extension add --name azure-devops |
4) Create new ADO project, import the example git repo to ADO and then clone it to Rover container
1 | # Create new folder in Rover container context |
- Initialize Rover & provision Launchpad
1 | $ cd $HOME |
- Deploy the landing zone
1 | # check that plan executes ok |
- Test that it works - by trying to add new rg to the sub without tags
1 | $ az group create -l westeurope -n my-test-rg |
- Cleanup
1 | # Note the order - destroy the landing zones before launchpad |
You can only have one Launchpad per Azure subscription. This is by design.
Continuous deployment using Azure DevOps
Now that you’ve seen how to deploy a landing zone locally using Rover you’re probably wondering how to do the same from CI/CD. Azure DevOps provides hosted agents which are the quickest way to get started with your Azure Pipelines. CAF TF landing zones documentation contains instructions for this nowadays but it still only covers the more complex approach, using a self-hosted ADO agent.
You don’t want to spend time at the beginning of a project setting up a build machine just to get started.
Since deployment from the local environment is done in container context, the same should apply to the pipeline as well. ADO supports container-based CI/CD pipelines - they’re called YAML pipelines. Just make sure to use the same container image that your Dev Container uses.
Check the correct container image version from /tf/caf/.devcontainer/docker-compose.yml
1 | #------------------------------------------------------------------------------------------------------------- |
Note: The Rover tool is developed actively and version changes over time.
My solution for ADO hosted agents
After a lot of testing and troubleshooting, I managed to get Rover function properly with ADO hosted agents. Sigh, I wish YAML pipelines would support dry runs from the local machine. Maybe one day.
Here’s MVP of azure-pipelines.yml for enabling continuous deployment to the dev environment
1 | name: "caf_landingzone_example" |
These are the main challenges I had to tackle
- You need to provide
--user 0in the container options - Running
sudois not supported in the YAML pipelines, it required a small hack to get it working - How to pass the correct parameters to
rover.sh, this is not really documented
Creating the Service Principal
The first thing you need is a Service Principal to serve as the identity for the pipeline.
There are two different versions of the Launchpad
- launchpad_opensource: for full blown GitOps
- launchpad_opensource_light: for more lightweight use
I haven’t tested the heavier version yet but so far the light version has been enough for my needs. The documentation on the security requirements for initializing the Launchpad is described here but for launchpad_opensource_light it’s only stated the Service Principal (SP) requires a Contributor RBAC role on the Azure subscription level.
I figure the launchpad’s implementation has changed since because there were additional permissions needed for the SP that finally got things working properly. You can check my Terraform code for more details.
Long story short: I ended up implementing the bootsrap for the SP itself using Terraform.
Setting up the pipeline
Here are instructions on how to get your pipeline set up with ease. I’ve spent some extra time making sure the example really works.
Create and run
1 | # Navigate to custom repo root in Rover container context |
Clean up
1 | # Remove the resources created through pipeline |