Hosting your own RTMP endpoint through a Docker container in the public cloud. I’ll show you how to get started.
Taking a hobby to the next level
Live streaming has become way more common these days when most of us “digital workers” have switched to the remote-only mode and everything happens virtually. I did my first (ever) live stream this spring as part of the Global Azure Virtual 2020 virtual event. It really pushed me to figure out the practicalities around hosting a live stream and delivering it successfully. Preparation really is the key and testing out things beforehand is a must. I can really recommend trying it out - you will get out of your comfort zone for sure!
Streaming the live video happened over a built-in RTMP endpoint on YouTube. This intrigued me to find out more about the subject. I have a special interest in video techniques, what can I say.
So I have this commercial drone from DJI - the Mavic 2 Pro. It’s pretty amazing, supports 4K video and has tons of features to choose from. I’ve been learning how to use it for over a year now, starting from the very basics and diving more deeply into customizing the camera settings for different lighting conditions and learning away from the autofocus.
Going through the menus and settings in the DJI GO 4 app I couldn’t help noticing the section under General Settings where it says Choose Live Streaming Platform

When you navigate further in the app it shows you the different options for live streaming

Finally, when you choose the Custom RMTP option, it asks you for the RMTP endpoint URL for ingesting the live stream

How can an engineer resist a challenge like this? I know I couldn’t :)
Node Media Server
The first question you should be asking yourself at this point: Why self-host when there’s plenty of services that can do it for you?
My arguments were
- Better control over the stream
- Making the stream private
- It’s more fun to build it yourself
I started to look for different options in the field. The most common approach people were using was to setup Media Streaming Server on top of Nginx. It seemed a little complex for my needs and I wanted to be able to customize the logic if needed. Plus I didn’t like the fact it required introducing NGinx. Then I found this Node Media Server from GitHub and was sold. It was simple to configure and runs on Node.js.
Node Media Server can do a whole lot of other things as well but I’m concentrating here on a couple its features in particular since I needed it to consume a single live stream
- RTMP endpoint
- Video recording
- Authentication
To get started, fork (or download directly) the source code from https://github.com/illuspas/Node-Media-Server and edit the configs directly in
app.js.
Minimum config for NMS to host RTMP endpoint is as follows
1 | const config = { |
The HTTP port is used for the Web Admin Panel. The version of NMS (v2.1.8) I was using didn’t support disabling it.
Using ffmpeg to capture video recordings
One of the libraries Node Media Server (NMS) utilizes under the hood is ffmpeg. For me, this was the single most important thing to get right because it’s responsible for generating the video record (MP4) from the stream.
To get the best quality for my use case I used the following settings
1 | const config = { |
You can check more info on FFmpeg’s H.264 Video Encoding settings from here.
Applying authentication
You can skip this part if you’re okay with exposing your RTMP endpoint to the public.
I wanted to make the live stream private. I wasn’t planning to broadcast through the RTMP endpoint. I simply wanted it to consume the live video stream from my drone and record it as MP4 for backup and other purposes. Also, I didn’t want others connecting to it in the cloud to ensure it runs smoothly and without interruptions.
NMS supports authentication out-of-the-box but few steps are required:
- Configure authentication on along with your secret
1 | const config = { |
Define length for your token’s expiration time and the name of your stream
The easiest way to do this is to create a JavaScript file (eg.
genAuthToken.js) and then execute it to generate the token
1 | $ cat <<EOF > genAuthToken.js |
- Generate the final url for the RTMP endpoint
1 | rtmp://<endpointaddress>/live/<nameofyourstream>?sign=<token> |
A couple of notes
- The sign keyword can not be modified
- This process is done per RTMP endpoint
Adding support for environment variables
Having to hardcode configuration values that are most likely to change per environment is never a good idea.
Let’s change the mediaroot and secret configs to read their values from environment variables by making the following changes to app.js
1 | const MediaRoot = process.env.MEDIA_ROOT || './media' |
Containerizing the NMS
Node.js apps are a perfect target for Docker containers. There was already a sample Dockerfile available in the repo but it was outdated and didn’t really work.
After some modifications, my version of the Dockerfile looked like this
1 | FROM node:10.20.1-alpine as install-npm |
Some takeaways from this
- NMS requires
ffmpegversion 4 or newer to function - Use production mode in Node.js app to optimize performance
- Multistage build minimizes the image size
- No need to expose a port for HTTP server
Build and push your version of the node-media-server container image to DockerHub. You can find detailed instructions here.
Hosting the NMS in a container
Up until this point, there has been nothing specific to the hosting environment apart from Docker.
You could, in theory at least, host the NMS as a serverless application. I like to keep my options open though, and going with serverless usually means locking yourself to the hosting platform more tightly. Plus this type of workload where I expect a steady load and long processing times is not ideal for it.
I’m using Azure for hosting the RTMP endpoint mainly because I have some other services running there that will do some post-processing for the video recordings. Azure provides several different services to choose from for running container workloads. The simplest one is Azure Container Instances (ACI) and I went with that.
Azure Container Instances
ACI has been around for a long time in Azure already and is quite a mature service for this type of use case. Although MS seems to be shifting focus more to Web Apps for Containers nowadays there is still active development put into it. If you need to run a single container workload in Azure without the need for hybrid connectivity this is your go-to service.
The way the service works is you define the computing resources, ports, and settings that your app requires and where to pull the container image from. Based on these specs ACI spins up your container and keeps it running. If you need to change any of these specs later on you terminate the instance and deploy a new one to replace it. If you’ve messed up something (like forget to inject environment variable that your app relies on) the runtime will try to initialize your app in a container several times but will eventually stop trying when it detects the app is not stable to be exposed to the outside world.
Persisting video recordings
Due to the nature of containers, you cannot rely on their state. Containers (and ACI) are stateless.
ACI supports mounting an Azure file share for persisting data. I hadn’t tried this out before but it worked like a charm.
Once you have your resource group created, just run these commands from the Azure CLI
1 | # Change these four parameters as needed |
Your file share should look similar to this in Azure portal

Then when you deploy the app to ACI just map the volume mount path with the same value as NMS’s media root (eg. /aci/media/) and provide the credentials from the previous step and it will just work.
Deployment using Azure CLI
ACI supports defining your app’s deployment in YAML format.
Here’s an example of what it would look like at this point
1 | #node-media-server.yml |
Deploying ACI using the template is straightforward with Azure CLI
1 | # Use same resource group name as in previous step |
Your ACI should look similar to this in Azure portal

If everything is running ok the logs show this

Live streaming to your RTMP endpoint
You’ve made it this far, hurray! Now to the fun part.
Testing locally from OBS Studio
One of the learnings from my first live stream experience was getting familiar with a tool called OBS Studio: free and open-source software for video recording and live streaming. It’s an excellent tool for creating professional live streams for different use cases, and as it turns out, for testing RTMP endpoints as well.
I’m showing here how to test against the RTMP endpoint hosted in Azure directly.
- Grab the final url from the earlier chapter (2.2).
- If you haven’t configured authentication to your RTMP endpoint then you can just omit the
?sign=<token>part from the URL.
- If you haven’t configured authentication to your RTMP endpoint then you can just omit the
- Replace the
<endpointaddress>part with the FQDN from your ACI- You can find the referenced
genObsAuth.jsfile from here
- You can find the referenced
1 | # Get RTMP endpoint address |
Complete url to be used for testing from OBS Studio looks something similar to this:rtmp://my-custom-rtmp.westeurope.azurecontainer.io/live/obs?sign=1595046544-bedf34dad9da573e43d709084078bd72
- Open OBS Studio
- Follow these instructions for adding a Scene and Video Capture Device using your webcam
- Verify that your video input is working

- Navigate to: Settings > Stream
- Fill in the stream details
- Service:
Custom - Server:
rtmp://<endpointaddress>/live - Stream Key:
obs?sign=<token>

- Apply + OK
- Press Start Streaming
- Wait for a second or two - if all goes well you’ll see the stream being broadcasted

- Let the stream run for a while and then press Stop Streaming
- Check the logs from the ACI container instance. You should see new events logged there, eg
1 | # Event in Node Media Server about converting the stream to MP4 after it was stopped |
Sending actual drone footage
The process from the DJI drone is very similar. The biggest difference is that you need to provide the Complete url in the Custom RTMP setting - which was sort of split into two parts when testing from OBS Studio.
- Substitute
<yoursecret>ingenAuthToken.jswith your own to generate<token>
1 | $ cat <<EOF > genAuthToken.js |
- Compose your Complete url substituting
<token>with the one generated in the previous step and transfer it to your mobile phone in a secure wayrtmp://my-custom-rtmp.westeurope.azurecontainer.io/live/dji?sign=<token>
- Power up the drone and your remote controller + attach a mobile phone to the controller
- Start the DJI 4 GO app
- Adjust the video settings for live streaming
- Video Format:
MP4 - Color:
None - Encoding Format:
H.264
- Video Format:

- Video Size:
4K/HQ 24fps

- Navigate to Custom RTMP setting
- General Settings > Choose Live Streaming Platform > Custom
- Enter your Complete url (see step 2)
- Press Next
- Press Start
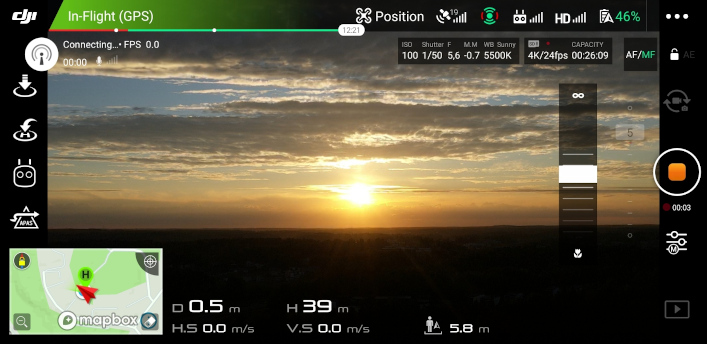
- Wait for a second or two and check from DJI 4 GO’s upper left corner the stream’s status (Live Streaming), you should see the number of seconds it has been broadcasting

- Press the broadcasting icon to enter the status screen and press End Livestreaming

- Press Yes to exit the live streaming screen
Finally, you can download the MP4 from Azure storage and check the end result
- Navigate to your Storage account in Azure portal
- Download the MP4 file with the latest date and open in a video player
